A herringbone splashback is one of the most eye-catching ways to finish a kitchen. Rectangular tiles are laid in a zig-zag pattern that draws the eye along the wall. It looks custom, but it takes careful planning to get right. This guide explains how it works and what to think about.
What is herringbone?
Herringbone is a pattern of rectangular tiles laid at right angles to each other, with the end of one tile meeting the long side of the next. The result is a series of V shapes running along the wall. It is often confused with chevron, where the tile ends are cut at an angle so the V points line up in a clean line. Herringbone has a stepped edge, while chevron is sharper.
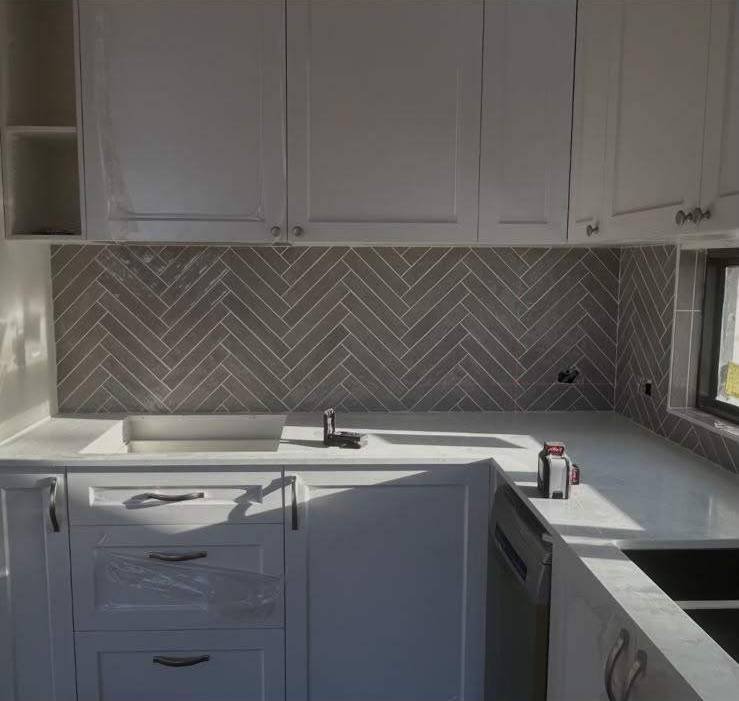
You can see a herringbone splashback in one of our job photos, where long narrow tiles run in a zig-zag behind a white kitchen bench.
Which tiles suit herringbone?
Long, narrow rectangular tiles work best. Common sizes include 100 by 300 mm or 75 by 300 mm. They can be gloss, satin or matt, and handmade-look tiles with slight variation add character. The tile has to be a consistent rectangle for the pattern to line up, so ask whether the tile is rectified.
Glazed ceramic tiles are usually a good fit for splashbacks, because they are easy to wipe clean and are not on the floor.
Setting out the pattern
Herringbone is set out from the centre of the splashback, usually behind the cooktop or the middle of the wall, so the pattern looks balanced on both sides. Starting at one end can leave an uneven pattern at the other.
Before any adhesive is used, the tiler marks a centre line and lays out a few tiles dry to check how the pattern falls. The edges then need to be cut to follow the benchtop, the cabinet underside and any windows or power points. Pattern edges that finish with a neat half tile look better than thin slivers.
Cutting and waste
Herringbone uses more cuts than a straight layout, so order more tiles. An allowance of 15 percent or more is common, depending on the size of the splashback and the number of obstacles. A tile saw or a good cutter is needed because every edge has to be neat.
Grout colour
Grout colour changes the pattern. A grout that matches the tile gives a softer, more textured look. A contrasting grout, like white between grey tiles, outlines every tile and makes the pattern bolder. Our photo shows white grout between grey tiles, which brings out the zig-zag.
Preparing the wall
The wall behind a splashback needs to be flat and clean. If it is uneven, the pattern will show it. Tiling over plasterboard that is in good condition is common. Behind a cooktop, check what the cooktop's installation instructions say about the surface and clearances.
Finishing at the benchtop
Where the tiles meet the benchtop, a small gap is left and filled with flexible sealant, not hard grout. This allows for movement and keeps water from getting behind the tiles. Sealant colour should match the grout.
Windows and corners
If your splashback includes a window sill or an internal corner, plan how the pattern will turn the corner. Some tilers carry the pattern around, while others finish the tile at the corner with a trim. Internal corners are also finished with flexible sealant.
Practical tips
- Choose a tile that suits both the look and the cleaning you are prepared to do
- Order extra tiles
- Decide on the centre point early
- Choose grout colour with a sample board
Herringbone on the floor or walls
The same pattern can be used on a bathroom floor or a feature wall, and many of the same rules apply. On a floor, the base has to be very flat because the pattern shows lippage. In a shower, the pattern needs a plan for the falls to the drain. Splashbacks are usually the best place to start, because they are small, visible and forgiving.
Does the pattern suit your kitchen?
Herringbone works best when the rest of the kitchen is calm. If you have busy benchtops, patterned floors and bold cabinets, a plain tile in a straight layout might look better. If the cabinets and benchtop are simple, a herringbone splashback gives the kitchen a focal point. Look at a sample laid out in the pattern, not just a single tile, because the pattern changes how the colour reads.
Ask your tiler to lay out a small section on the floor so you can see the pattern before the wall is tiled.
Talk to us
If you are planning a herringbone splashback, call Brisbane Wall and Floor Tiling on 0406 482 001 or send an enquiry. We work across Brisbane, Logan, the Gold Coast, Ipswich and Redland Bay.
Related Services and Areas
See our Wall Tiling page, or browse all services. We work in Daisy Hill, Brisbane CBD, Ipswich, Redland Bay and across the Gold Coast. Call 0406 482 001 or send an enquiry.