
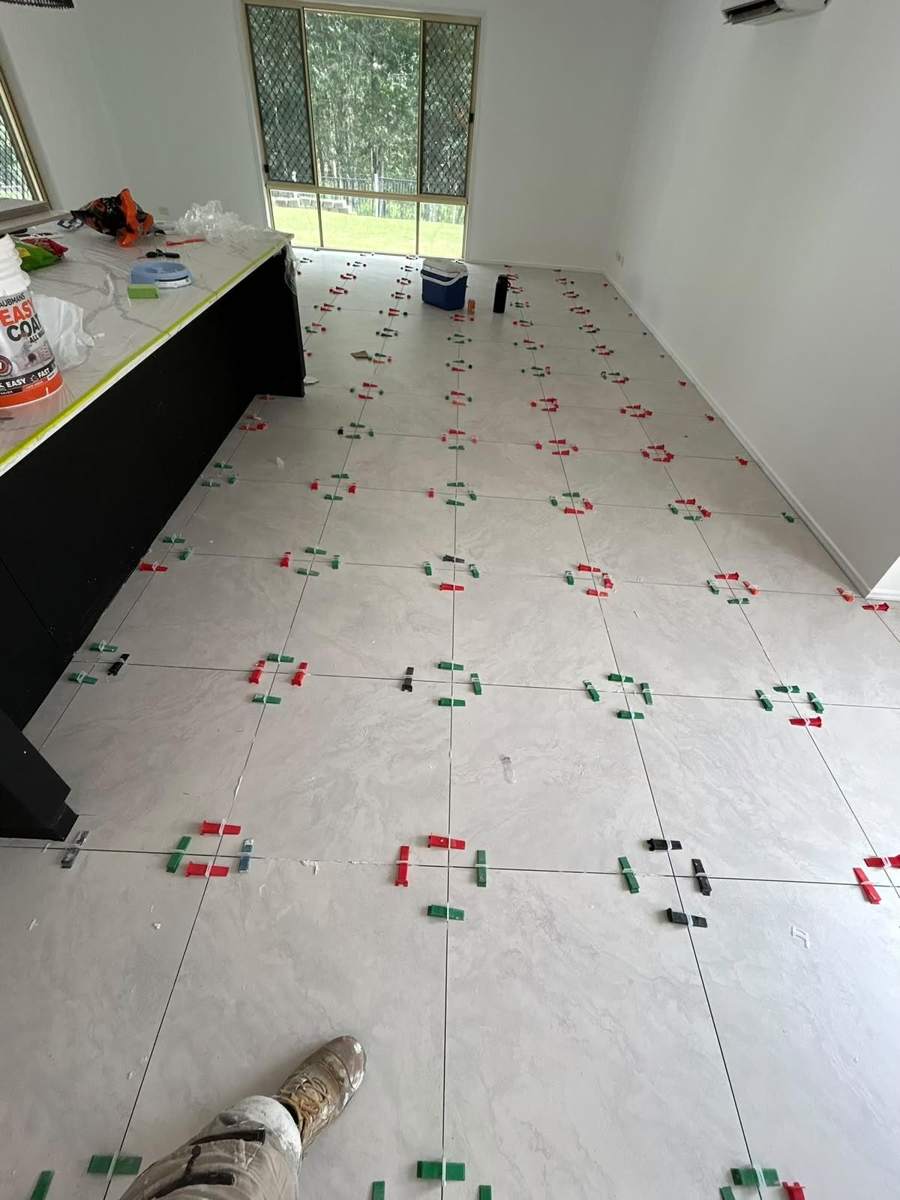
If you have seen a floor being tiled recently, you may have spotted small plastic clips scattered across the tiles with red or green wedges in them. They look odd, but they are one of the most useful tools in a tiler's kit. This guide explains what levelling clips are and why they help.
What are levelling clips?
A levelling clip system has two parts. A small plastic base sits under the corner of two or four tiles and has a tab that rises up between them. A cap or wedge slips over the tab and presses down, holding the edges of neighbouring tiles at the same height. The clips stay in place while the adhesive cures, and then they are knocked off with a light tap.
You can see them in photos of floor tiling as rows of small coloured pieces across the floor. The colours are only different brands or sizes.
The problem they solve: lippage
When tiles are laid, the edges do not always sit flush. One tile may be a fraction higher than the next. This is called lippage. On a small floor with small tiles it can be hard to notice. On a large floor with polished tiles that reflect light, a tiny step shows up clearly and is easy to catch your toe on.
Clips pull neighbouring tiles together at the same height. They also keep a consistent joint width, because the tab sets the gap between the tiles.
Why large tiles need them more
Large tiles are heavier and more rigid. They are more likely to rock on the adhesive while they set. They also tend to have slight bow or warp, so the middle can sit higher than the edges. Clips help pull the edges into line.
On big floors with polished or glossy tiles, clips are one of the best ways to get a flat, even result.
What clips cannot do
Clips are not a substitute for a flat floor. If the floor underneath is not flat, the tiles will still sit on high and low spots, and the clips cannot fix that. Prep is still the first job. The floor is checked, ground or levelled, and only then are tiles laid.
Clips also need the right adhesive. The adhesive has to be spread evenly and the tile pressed down properly. If there are voids under the tile, a clip may hold the edge level while the middle is hollow.
How we use them
On a floor like a kitchen or living area, tiles are laid in sections. After each tile is placed, clips are pushed under the edge and the wedges are tightened. We check the surface with a straight edge as the work goes on. Once the adhesive has cured, the clips are removed and the joints are cleaned out for grouting.
You will see these clips in many of our job photos, because they are part of how we set most large-format floors.
Joint width and tile size
The clip tab sets the joint width. Common sizes are 1.5 mm, 2 mm and 3 mm. A tight joint looks sleek, but tiles are rarely perfectly square, so a slightly wider joint is more forgiving. For rectified tiles with precise edges, a narrower joint is possible. For tiles with slight variation, a wider joint looks better.
After the clips are removed
When the clips come off, the tiles are left with clean, straight joints. The adhesive in the joints is cleaned out to the right depth, and then the floor is grouted. Movement joints are left where needed at the walls and across large areas.
What to ask your tiler
- Do you use levelling clips on large-format tiles?
- How will the floor be checked for flatness first?
- What joint width do you recommend for this tile?
- Where will the movement joints go?
A note on cleaning up
Adhesive that squeezes up between the tiles needs to be cleaned out before it sets, because the clips sit in the joint and any hard lump can stop a clip from seating properly. Keeping the joints clean as the floor goes down saves time at the grouting stage and gives a neater result. It is a small habit that shows in the finished floor.
What you will see on site
If you visit your home while the floor is being laid, do not be alarmed by the clips and wedges. They are temporary. They are removed before grouting, and none of them stay in the floor. It is normal to see a large area covered in them while the adhesive cures, and it usually means the job is being done carefully.
Talk to us
If you are planning a floor with large tiles, call Brisbane Wall and Floor Tiling on 0406 482 001 or send an enquiry. We work across Brisbane, Logan, the Gold Coast, Ipswich and Redland Bay.
Related Services and Areas
See our Floor Tiling page, or browse all services. We work in Daisy Hill, Brisbane CBD, Ipswich, Redland Bay and across the Gold Coast. Call 0406 482 001 or send an enquiry.